목표
- 플레이어를 회전 및 이동하기.
구현 순서
- 사용자 입력 맵핑
- 플레이어 회전 처리
- 플레이어 이동 처리
1. 사용자 입력 맵핑하기
IA_LookUp
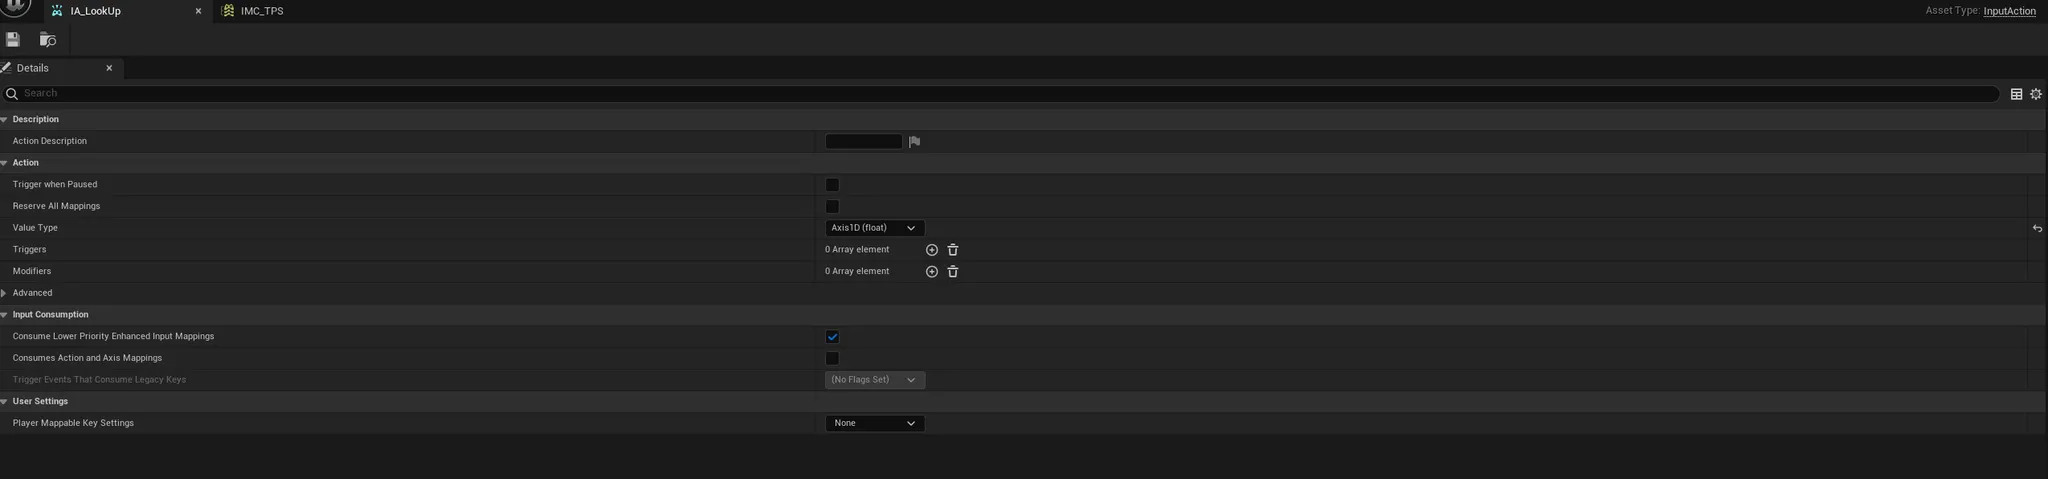
IMC_TPS
IA_LookUp 입력에 Negate 값을 설정한 이유는 마우스의 좌표가 스크린 좌표 즉 모니터의 좌표가 좌측 상단(y : 0, z : 0)에서 시작하여 y 값은 오른쪽으로 갈수록 커지고, z 값은 아래로 갈수록 커집니다.
반면에 3D 월드상에서의 좌표계는 다소 다릅니다.
y축의 값은 마찬가지로 오른족으로 이동하며 커지는 반면, z축 값은 위로 올라갈수록 커집니다.
마우스의 Z축 방향과 3D 월드상의 방향이 반대로 되어있습니다. 따라서 IA_LookUp의 Modifiers에 -1값에 해당하는 Negate를 추가해 줌으로써 방향을 일치시키려고 하는 것입니다.
IA_Turn
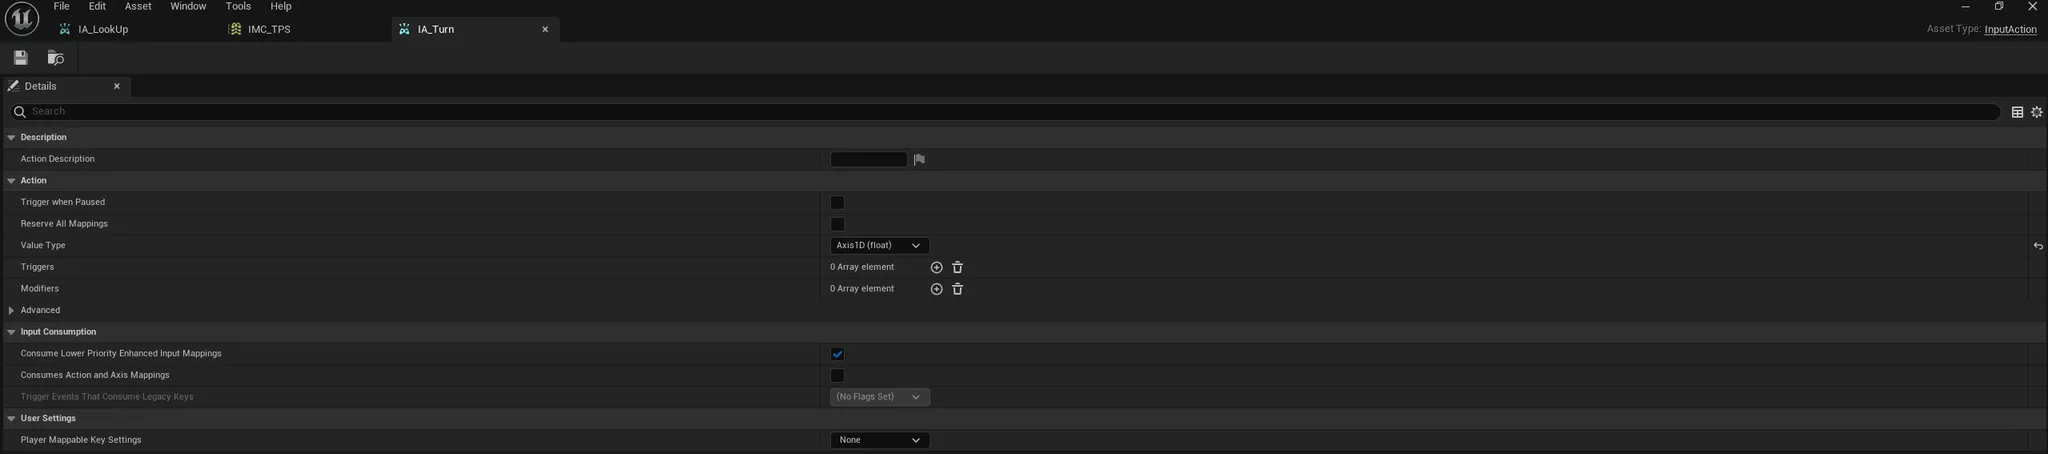
IMC_TPS

2. 플레이어 회전 처리하기.
회전은 플레이어가 회전을 사용자의 마우스 입력, 혹은 키보드 입력에 따라 회전 회전이라는 것은 플레이어의 제어가 필요합니다. BP_TPSPlayer 블루프린트를 열기.
마우스를 이용한 회전 처리를 위해 총 3군데에 설정 요소가 있습니다. 컴포넌트 창에서 BP_TPSPlayer(self)를 선택합니다.
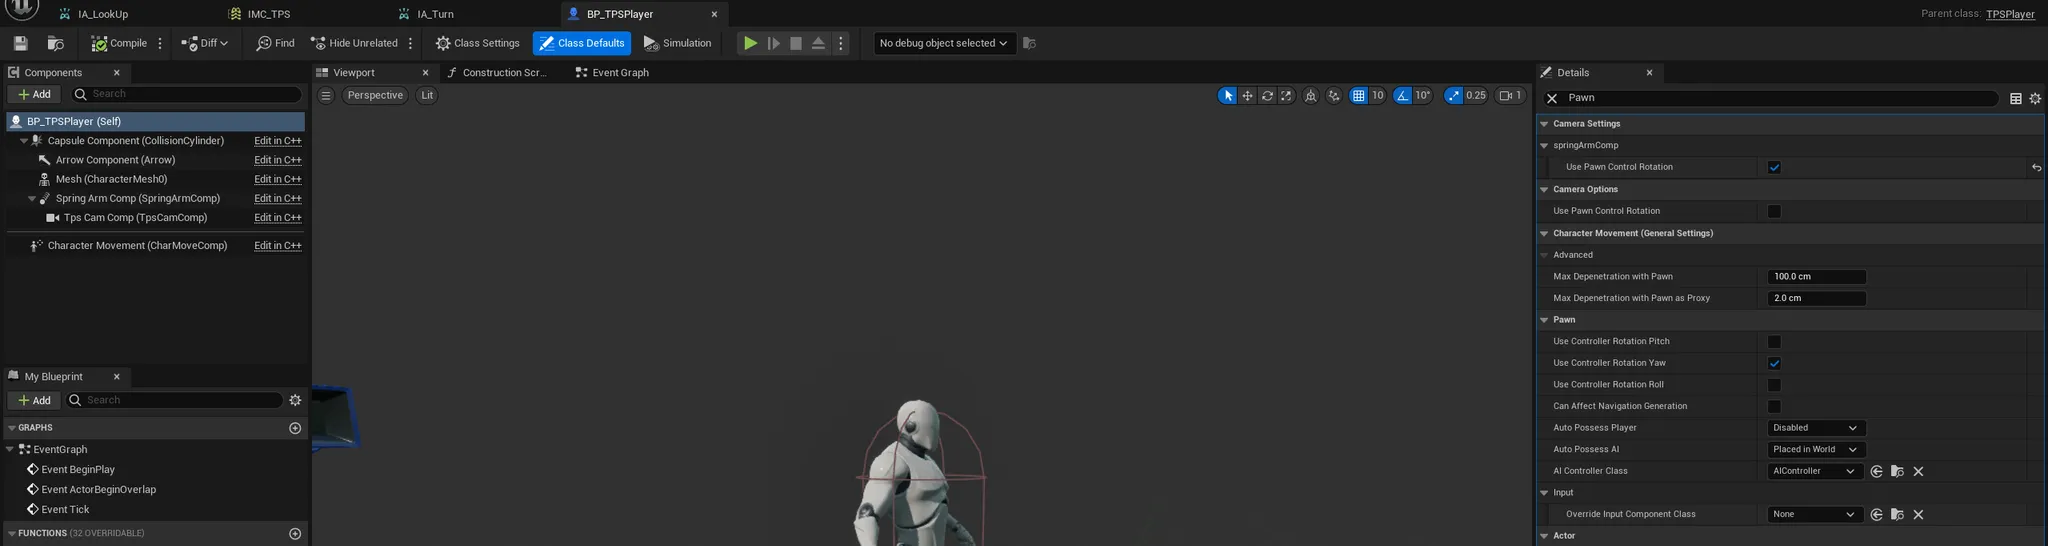
마우스를 이용한 회전처리 옵션 설정
Pawn의 Use Controller Rotation : 각 회전축으로 사용자 입력에 따라 회전시킬지의 여부를 나타냅니다.
SpringArm의 Use Pawn Control Rotation : 폰에 회전 입력이 들어오면 스프링암 컴포넌트를 회전시킬지의 여부를 선택 Camera Options Use Pawn Control Rotation : 폰의 회전 입력을 사용할지의 여부를 나타내는 설정입니다.
사용자 입력에 따른 회전 처리 구현
ATPSPlayer::ATPSPlayer()
{
 	// Set this character to call Tick() every frame.  You can turn this off to improve performance if you don't need it.
	PrimaryActorTick.bCanEverTick = true;

	// 1. 스켈레탈메시 데이터를 불러오고 싶다.
	ConstructorHelpers::FObjectFinder<USkeletalMesh> TempMesh(TEXT("SkeletalMesh'/Game/Characters/Mannequin_UE4/Meshes/SK_Mannequin.SK_Mannequin'"));
	if (TempMesh.Succeeded())
	{
		GetMesh()->SetSkeletalMesh(TempMesh.Object);

		// 2. Mesh 컴포넌트의 위치와 회전 값을 설정하고 싶다.
		GetMesh()->SetRelativeLocationAndRotation(FVector(0, 0, -90), FRotator(0, -90, 0));

	}

	// 3. TPS 카메라를 붙이기
	// 3-1. SpringArm 컴포넌트를 붙이기
	springArmComp = CreateDefaultSubobject<USpringArmComponent>(TEXT("SpringArmComp"));
	springArmComp->SetupAttachment(RootComponent);
	springArmComp->SetRelativeLocation(FVector(0, 70, 90));
	springArmComp->TargetArmLength = 400;
	springArmComp->bUsePawnControlRotation = true;

	// 3-2. Camera 컴포넌트 붙이기
	tpsCamComp = CreateDefaultSubobject<UCameraComponent>(TEXT("TpsCamComp"));
	tpsCamComp->SetupAttachment(springArmComp);
	tpsCamComp->bUsePawnControlRotation = false;

	bUseControllerRotationYaw = true;

}
사용자 마우스 입력 처리 함수 생성
Header
public:
	UPROPERTY(EditDefaultsOnly, Category="Input")
	class UInputMappingContext* imc_TPS;

	UPROPERTY(EditDefaultsOnly, Category = "Input")
	class UInputAction* ia_LookUp;

	UPROPERTY(EditDefaultsOnly, Category = "Input")
	class UInputAction* ia_Turn;

	// 좌우 회전 입력 처리
	void Turn(const struct FInputActionValue& inputValue);

	// 상하 회전 입력 처리
	void LookUp(const struct FInputActionValue& inputValue);
Cpp
// Called to bind functionality to input
void ATPSPlayer::SetupPlayerInputComponent(UInputComponent* PlayerInputComponent)
{
	Super::SetupPlayerInputComponent(PlayerInputComponent);

	auto PlayerInput = CastChecked<UEnhancedInputComponent>(PlayerInputComponent);
	if (PlayerInput)
	{
		PlayerInput->BindAction(ia_Turn, ETriggerEvent::Triggered, this, &ATPSPlayer::Turn);
		PlayerInput->BindAction(ia_Turn, ETriggerEvent::Triggered, this, &ATPSPlayer::LookUp);
	}

}

void ATPSPlayer::Turn(const FInputActionValue& inputValue)
{
	float value = inputValue.Get<float>();
	AddControllerYawInput(value);
}

void ATPSPlayer::LookUp(const FInputActionValue& inputValue)
{
	float value = inputValue.Get<float>();
	AddControllerPitchInput(value);
}
3차원 좌표계를 사용할 때 이동에 대한 좌표계는 X축, Y축, Z 축을 이용하여 사용합니다.
각 축을 기준으로 회전할 때 X축 회전은 Roll, Y축 회전은 Pitch, Z축 회전은 Yaw라는 용어로 사용하게 됩니다.
Enhanced Input System Add imc_TPS
// Called when the game starts or when spawned
void ATPSPlayer::BeginPlay()
{
	Super::BeginPlay();

	auto pc = Cast<APlayerController>(Controller);
	if (pc)
	{
		auto subsystem = ULocalPlayer::GetSubsystem<UEnhancedInputLocalPlayerSubsystem>(pc->GetLocalPlayer());

		if (subsystem)
		{
			subsystem->AddMappingContext(imc_TPS, 0);
		}
	}

}
Enhanced Input System에 IMC_TPS Input Mapping Context를 추가합니다.
TPSProject.Build.cs Add EnhancedInput module
// Copyright Epic Games, Inc. All Rights Reserved.

using UnrealBuildTool;

public class TPSProject : ModuleRules
{
	public TPSProject(ReadOnlyTargetRules Target) : base(Target)
	{
		PCHUsage = PCHUsageMode.UseExplicitOrSharedPCHs;

		PublicDependencyModuleNames.AddRange(new string[] { "Core", "CoreUObject", "Engine", "InputCore", "EnhancedInput" });

		PrivateDependencyModuleNames.AddRange(new string[] {  });

		// Uncomment if you are using Slate UI
		// PrivateDependencyModuleNames.AddRange(new string[] { "Slate", "SlateCore" });

		// Uncomment if you are using online features
		// PrivateDependencyModuleNames.Add("OnlineSubsystem");

		// To include OnlineSubsystemSteam, add it to the plugins section in your uproject file with the Enabled attribute set to true
	}
}
Unreal Project에 EnhancedInput Module을 추가합니다.
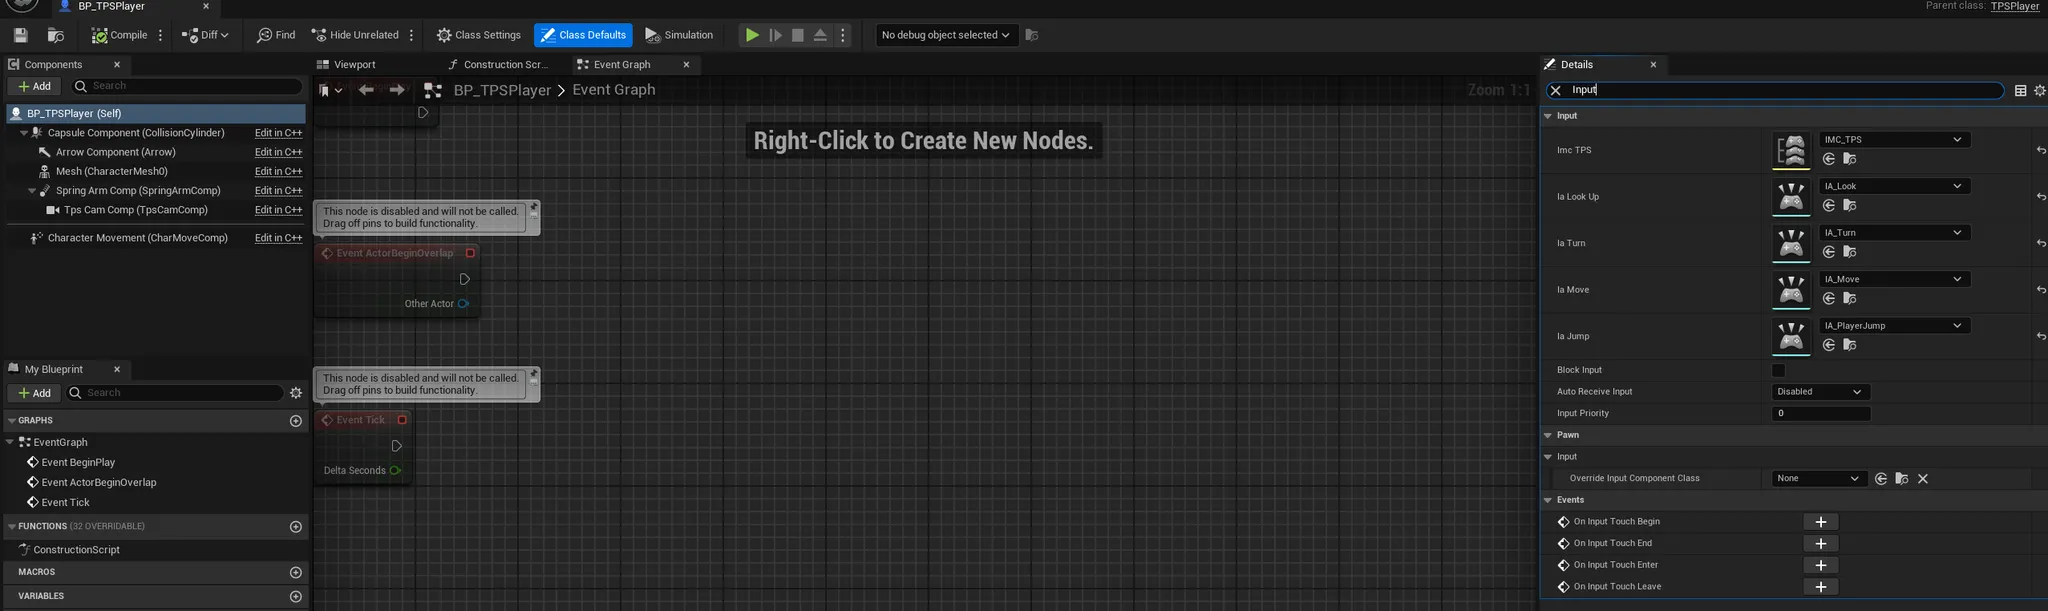
BP_TPSPlayer에 Input Mapping
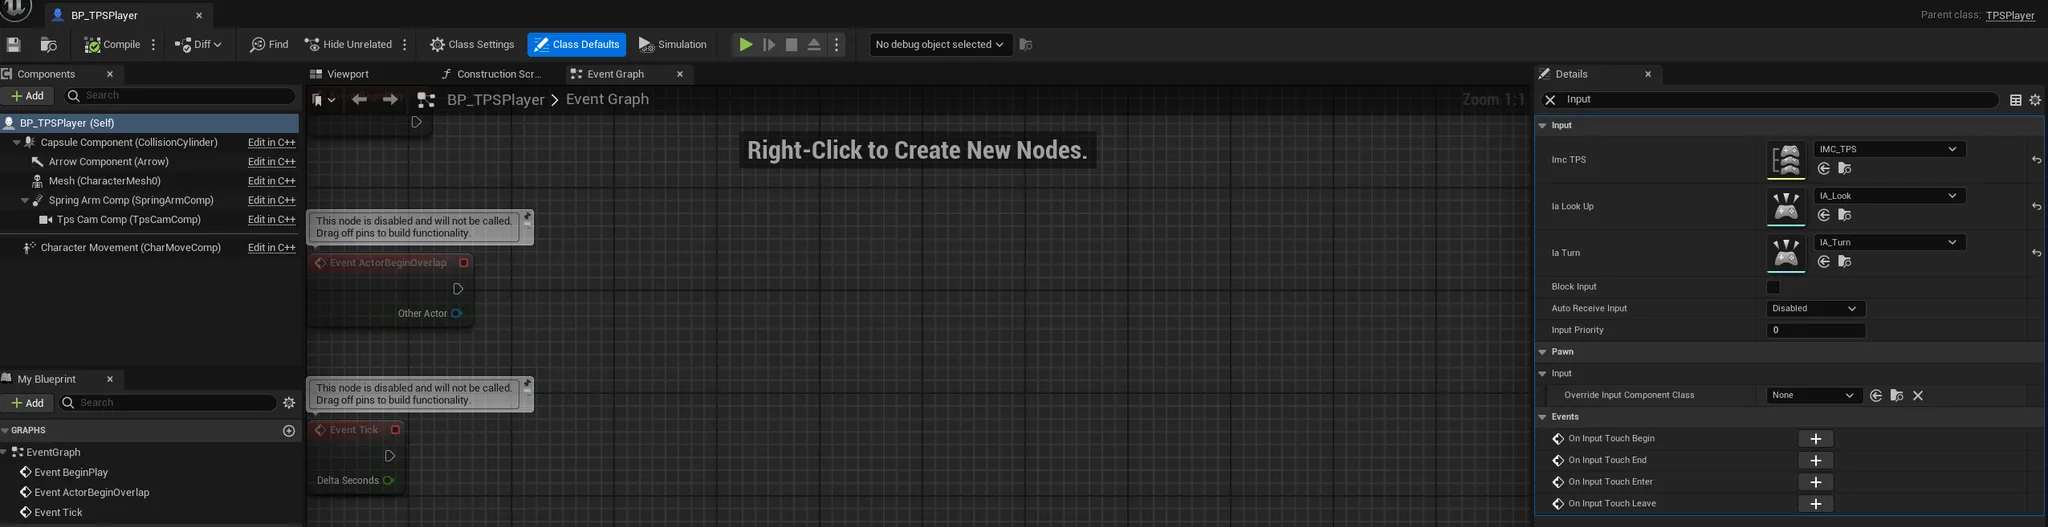
CPP 로 정의한 Input Action과 Input Mapping Context들을 매핑해줍니다.
3. 플레이어 이동
플레이어 이동 처리
캐릭터 이동 처리 Input Action 생성
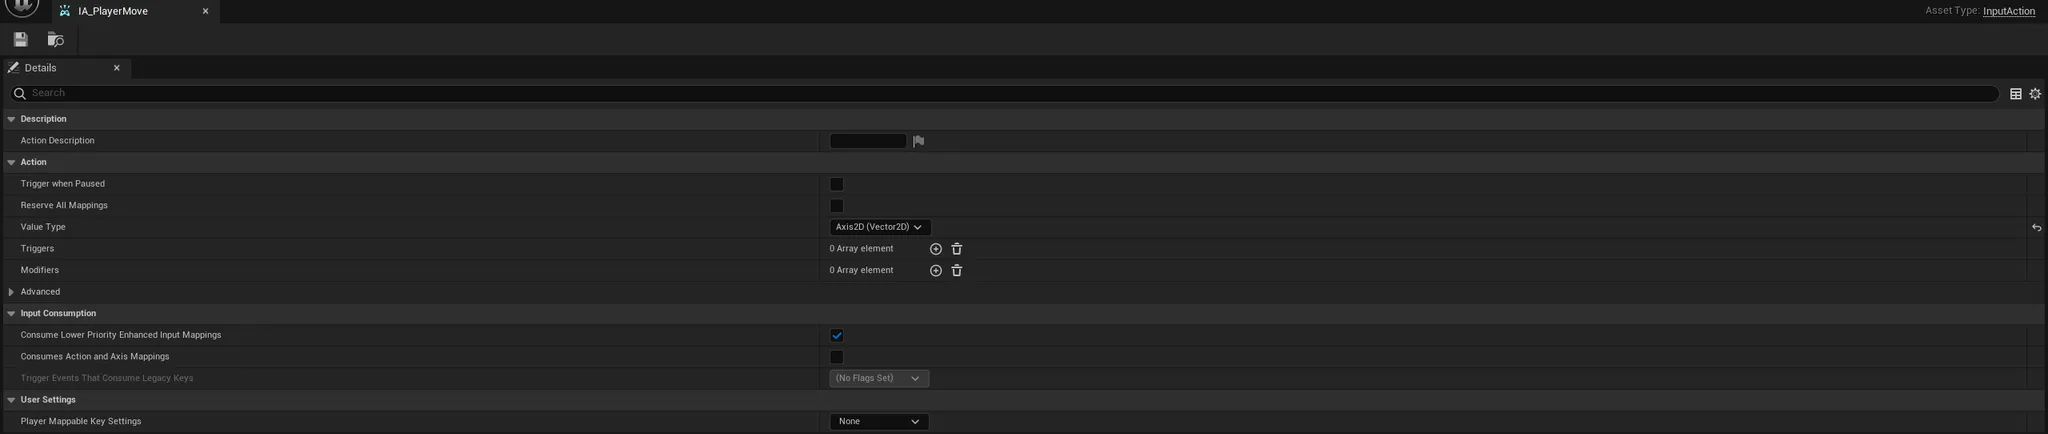
좌우상하 입력 처리를 위한 Axis2D(Vector2D)로 설정.
Player Move 키매핑
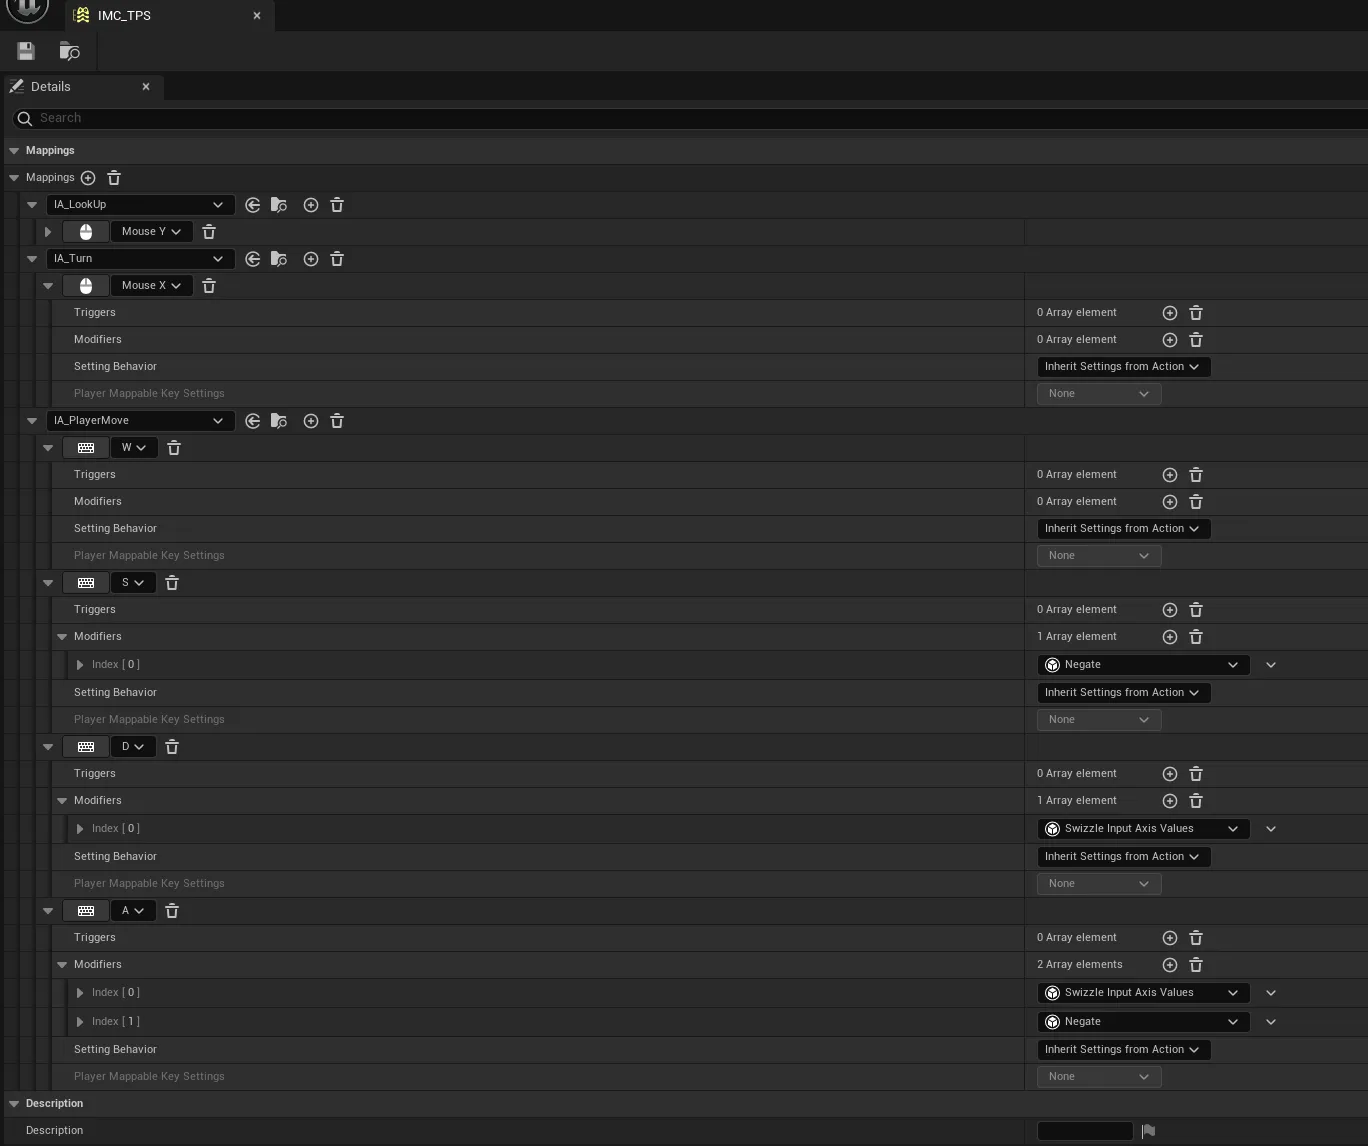
W : 설정 없음
S : Modifiers → Negate
D : Modifiers → Swizzle Input Axis Value
A : Modifiers → Swizzle Input Axis Value, Negate
IA_PlayerMove의 Value Type은 Axis2D입니다. 값으로 치면 X, Y 두 값이 들어갑니다. W, S 키 같은 경우는 X 값이 들어가게 됩니다. D키의 경우도 X에 들어갑니다 입력된 값을 이용해 이동 처리를 수행할 때 값이 모두 X에 들어오는 문제가 발생합니다. 좌우 값을 Y값에 들어오도록 설정해주면 문제 없이 사용할 수 있습니다. Swizzle Input Axis Value를 할당하면 D키를 눌렀을 때 X, Y, Z 순서가 아닌 Y, X, Z 순서로 값이 할당됩니다.
목표 : 사용자의 좌우 입력을 받아 이동
- 필요 속성 : 인풋 액션, 이동 속도, 이동 방향
이동 속성 및 처리 함수 선언
UPROPERTY(EditDefaultsOnly, Category = "Input")
class UInputAction* ia_Move;

// 이동 속도
UPROPERTY(EditDefaultsOnly, Category = PlayerSetting)
float walkSpeed = 600;

// 이동 방향
FVector direction;

void Move(const struct FInputActionValue& inputValue);
이동 속성
이동 처리 함수 바인딩
// Called to bind functionality to input
void ATPSPlayer::SetupPlayerInputComponent(UInputComponent* PlayerInputComponent)
{
	Super::SetupPlayerInputComponent(PlayerInputComponent);

	auto PlayerInput = CastChecked<UEnhancedInputComponent>(PlayerInputComponent);
	if (PlayerInput)
	{
		PlayerInput->BindAction(ia_Turn, ETriggerEvent::Triggered, this, &ATPSPlayer::Turn);
		PlayerInput->BindAction(ia_LookUp, ETriggerEvent::Triggered, this, &ATPSPlayer::LookUp);
		// 상하좌우 이동처리함수 바인딩
		PlayerInput->BindAction(ia_Move, ETriggerEvent::Triggered, this, &ATPSPlayer::Move);
	}

}

void ATPSPlayer::Move(const FInputActionValue& inputValue)
{
	FVector2D value = inputValue.Get<FVector2D>();
	// 상하 입력 이벤트 처리
	direction.X = value.X;
	// 좌우 입력 이벤트 처리
	direction.Y = value.Y;
}
등속 운동 공식
P = P0 + v * t
플레이어 이동 구현

절대좌표
기준이 되는 주체 없이 누구에게나 동일한 방향을 가리키는 절대 좌표로의 이동 벡터 ex) Up키를 누르면 무조건 x축에 1값이 들어가게 되는 구조.
상대좌표
컨트롤하고 있는 방향(상대 좌표)에서의 앞으로 이동하도록 하기
절대좌표를 상대 좌표로 변환하기
// 이동 방향을 컨트롤 방향 기준으로 변환하기
direction = FTransform(GetControlRotation()).TransformVector(direction);
캐릭터의 움직임을 처리해줄 Character Movement
물리적인 법칙을 잘 적용하여 코드로 옮기는 것이 쉬운 일은 아닙니다. 언리얼 게임 프레임워크에는 캐릭터의 움직임을 처리해줄 Charcacter Movement 라는 컴포넌트를 제공합니다.
이 컴포넌트 기능을 이용하면 언리얼을 이용해 상용화된 수많은 게임에서 활용가능한 움직임을 콘텐츠에서 표현이 가능합니다. 캐릭터 무브먼트 컴포넌트의 이동 및 회전 기능은 Character 클래스에서 제공합니다.
등속 운동 코드를 캐릭터 클래스에서 제공하는 기능으로 변경합니다. AddMovementInput() 함수의 Scale 인수 값은 direction 벡터에 이미 반영되어 있기 때문에 생략 가능합니다.
void ATPSPlayer::Tick(float DeltaTime)
{
	Super::Tick(DeltaTime);

	// 플레이어 이동처리
	// 등속 운동
	// P(결과 위치) = P0(현재 위치) + v(속도) * t(시간)

	// 이동 방향을 컨트롤 방향 기준으로 변환하기
	direction = FTransform(GetControlRotation()).TransformVector(direction);
	/*FVector P0 = GetActorLocation();
	FVector vt = direction * walkSpeed * DeltaTime;
	FVector P = P0 + vt;
	SetActorLocation(P);*/
	AddMovementInput(direction);
	direction = FVector::ZeroVector;

}
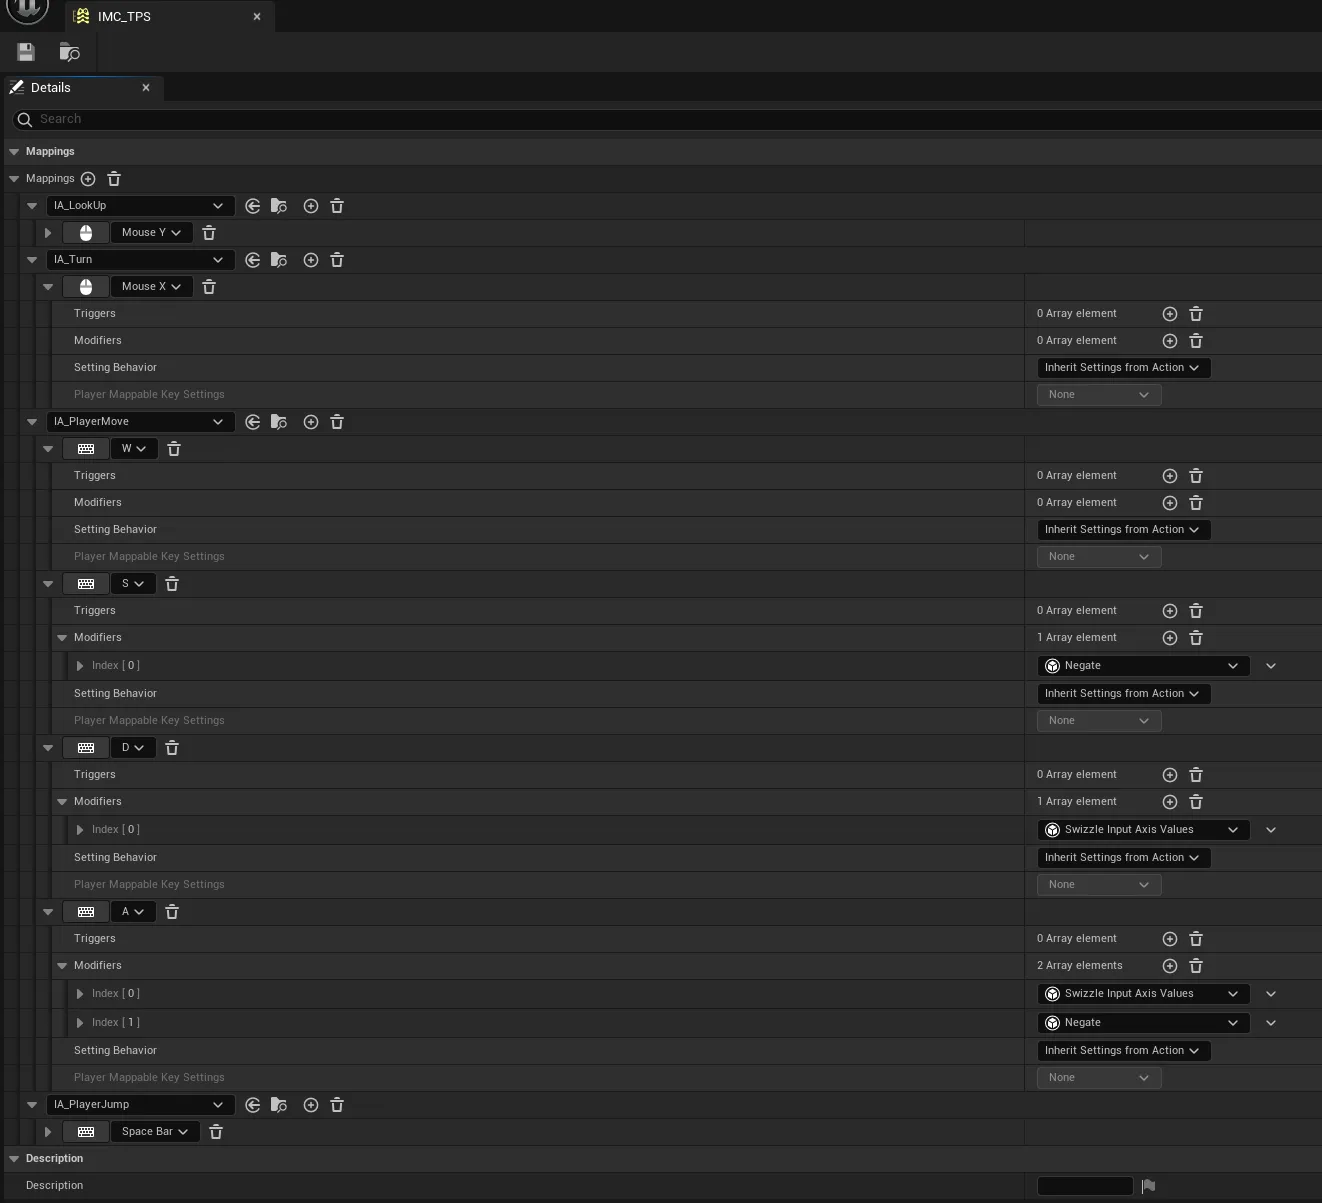
IA_PlayerJump 생성
InputJump 함수 구현
- 헤더
UPROPERTY(EditDefaultsOnly, Category = "Input")
class UInputAction* ia_Jump;

// 점프 입력 이벤트 처리 함수
void InputJump(const struct FInputActionValue& inputValue);
- 매핑 및 정의
// Called to bind functionality to input
void ATPSPlayer::SetupPlayerInputComponent(UInputComponent* PlayerInputComponent)
{
	Super::SetupPlayerInputComponent(PlayerInputComponent);

	auto PlayerInput = CastChecked<UEnhancedInputComponent>(PlayerInputComponent);
	if (PlayerInput)
	{
		PlayerInput->BindAction(ia_Turn, ETriggerEvent::Triggered, this, &ATPSPlayer::Turn);
		PlayerInput->BindAction(ia_LookUp, ETriggerEvent::Triggered, this, &ATPSPlayer::LookUp);
		PlayerInput->BindAction(ia_Move, ETriggerEvent::Triggered, this, &ATPSPlayer::Move);
		// Jump 매핑
		PlayerInput->BindAction(ia_Jump, ETriggerEvent::Started, this, &ATPSPlayer::InputJump);
	}

}

void ATPSPlayer::InputJump(const FInputActionValue& inputValue)
{
	Jump();
}
BP_TPSPlayer에 Jump 매핑
Jump 상세 속성 변경
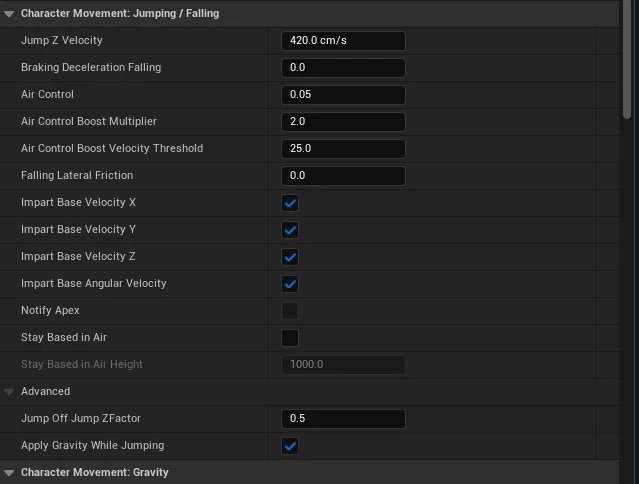
2단 점프 지정
// Sets default values
ATPSPlayer::ATPSPlayer()
{

	//... 생략
	// 2단 점프
	JumpMaxCount = 2;

}
플레이어 이동 처리 함수 분할
// Called every frame
void ATPSPlayer::Tick(float DeltaTime)
{
	Super::Tick(DeltaTime);

	PlayerMove();
}

void ATPSPlayer::PlayerMove()
{
	// 플레이어 이동 처리
	direction = FTransform(GetControlRotation()).TransformVector(direction);
	AddMovementInput(direction);
	direction = FVector::ZeroVector;
}
스프링 암 컴포넌트의 Lag 속성
스프링 암 컴포넌트의 Lag 속성이 존재합니다. 3인칭 모드의 카메라가 타깃을 따라 이동 또는 회전할 때 지연되어 부드럽게 따라갈 수 있도록 처리합니다.
TPS 게임에서는 사용하기 애매하지만 다른 3인칭 콘텐츠에서는 사용하면 멋진 카메라 움직임을 표현할 수 있습니다.
'Unreal' 카테고리의 다른 글
| UE - 총알 발사하기 (1) | 2024.11.09 |
|---|---|
| UE - 총알 제작하기 (2) | 2024.11.02 |
| UE - 3인칭 플레이어 생성 (0) | 2024.10.19 |
| UE - 3인칭 TPS 프로젝트 생성하기 (0) | 2024.10.12 |
| UE - 실행 파일로 패키징 (0) | 2024.10.05 |


